Fireplace Cooking
Philosophy
While rewarding in so many other ways, authentic fireplace cooking (where entire meals are cooked in the fireplace), truth be known, is a tedious, time consuming, physically demanding, dirty, and somewhat dangerous endeavor. I say this as an ex-restaurant chef who has spent countless hours cooking under demanding and stressful conditions. Even before you begin cooking, you must skillfully build and maintain a very hot fire using heavy hardwood. Then you must continuously poke about it, shoveling hot embers to and fro. The pans are heavy and the handles always very hot and all the while you are stooped over or squatting in front of the heat and the flames, dodging the occasional flying spark. You will quickly understand (and appreciate) why "American women readily abandoned their kitchen fireplaces when the revolutionary wood-burning cookstoves were introduced in the early 1800's".
 Why bother then? Well, why bother making an "ambient" fire or building a fireplace to begin with? We enjoy fires and we enjoy cooking, even though both of them are arguably unnecessary in today's modern world. As a professional cook I found it fascinating to explore these origin methods of all the world's great cuisines. Those with experience claim that "food prepared [on modern cooking equipment]... simply doesn't taste as good." For some it might seem fulfilling on some level, but hard to explain. Others are just drawn to the "magic" of fire. So its not rational and reasoned, but rather intuitive, and even primal motivation that explains why people are now rediscovering the basic pleasures and deep satisfaction of cooking in the fireplace.
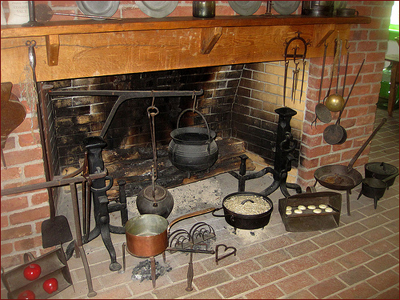
I am not suggesting that you run out and buy a crane and trammel, trivet and Dutch oven, but I do encourage you to consider buying The Open Hearth Cookbook and if possible, visit a living museum such as Plimoth Plantation or Old Sturbridge Village to discover what fireplace cooking was and is all about.
Spit roasting was just another cooking method back in the 18th and 19th centuries and a mechanical jack was probably considered fancy and progressive at the time. One could say that modern outdoor grilling represents the remnants of fireplace cooking. Not only that, it provides a precedent and convenient reference for cooking with an indoor fire. It takes about the same effort to prepare and maintain, carries similar danger and provides variety in both method and flavor. While it is perhaps impractical to conjure up a full-blown kitchen in your home fireplace (the old ones were actually quite large and designed for the purpose) the mechanical spit does provide a plausible compromise and way to extend the pleasures of cooking directly with fire to a "new" venue.
The Cooking Fire
While it may seem like a simple, straightforward procedure, and one at which you might feel quite proficient, building a proper cooking fire is rarely done correctly (most efficiently) and is arguably the most important element of the process.
Below are two examples of how to do it right; one from Charlie van Over, a restaurateur, chef, author and fireplace cooking enthusiast, and the other, an excerpt from one of the few good books on fireplace cooking.
(The following is reprinted, in part, from Building the Cooking Fire from The Open Hearth Cookbook. It is written primarily for someone who is doing more than just spit roasting, but the principals are still the same. This creates a very hot fire very quickly if done correctly.)
"Here is a simple way of stacking wood for a cooking fire that we have found most successful and that requires, for starters, only six good-sized pieces of split and seasoned hardwood, kindling, newspaper, matches, and a clear, clean hearth.
To lay your fire, begin by placing two of the logs on the hearth floor with their ends at right angles to, and almost touching, the rear wall of your fireplace. These first two logs will act as supports or "andirons" for the remaining logs. [Note: as an alternative you could use log dogs, cast iron supports that serve the same purpose.] Next, lay lay the remaining four logs across the top of the bottom two, parallel to the back wall of the fireplace, and leave some space between them for the fire to breathe. Kindling (sticks, crumpled paper, pinecones, wood shavings, etc.) should then be placed on top of the logs and stuffed into the cracks between them, and into the low tunnel formed by the stacking configuration. [Note: you may need a different configuration of logs depending on the thickness and length of the logs and the size your fireplace. I like to add another layer on top.]
Ignite the kindling, [make sure your your flue is open and your chimney has been recently serviced] with a makeshift torch of twisted newspaper. Next, hold the torch up the open chimney flue to encourage a healthy draft. The fire can also be fanned at this point with a bellows, magazine, folded newspaper [or your breath] to ensure a strong start.
Stacking your wood in this manner leaves a natural space for the coals to accumulate in, and gives the cook easy access to them as they are needed for baking, frying, and broiling without having to disturb the fire's design.
It is most important to maintain the the fire's basic configuration when adding new logs and until all of your cooking is completed. About two hours and two generous armfuls of wood are needed to prepare the average full-course meal. From our experience the upper logs will burn with greater vigor than do the andiron logs. They will need to be replenished sooner and more frequently.
The andiron logs will not need to be replaced as often, but, when they do, substantial rebuilding and manipulating of the fire's hot logs may be necessary in order to maintain the fire's basic shape. Using green or unseasoned wood [or thicker logs] for the andiron logs can delay and even eliminate the last step, especially when preparing foods that cook quickly.
For roasting a large piece of meat such as a suckling pig, or for cooking numerous smaller items simultaneously, like ducks, chickens or Cornish hens, it will be necessary to build a wider or double version of the basic cooking fire. If your fireplace is big enough to accommodate cooking on this scale, a double cooking fire should be adequate for the most ambitious of meals. to build a fire of this design, use three andiron supports instead of two, and proceed in the same way outlined above.
As a general rule, the length of the fire should equal the length of the spitted food in order for the food to roast evenly. Another important guideline to remember when building a cooking fire is that its size should be governed by the standard length (about 18 inches) of most pieces of split and cut firewood, and not necessarily by the size of one's fireplace. Should your fireplace be very small, it may be necessary to have your logs cut shorter than the 18 inch standard."
 It is most important to maintain the the fire's basic configuration when adding new logs and until all of your cooking is completed. About two hours and two generous armfuls of wood are needed to prepare the average full-course meal. From our experience the upper logs will burn with greater vigor than do the andiron logs. They will need to be replenished sooner and more frequently.
Rediscovering the Lost Art of Building a Fire
January 23, 2004
Charlie van Over
The folklore of the hearth, the wood burning fireplace of Colonial times, permeates our psyche here in New England. A home without a fireplace lacks warmth even when the thermostat is turned up to the seventies. The colonial-era fireplace was the center of every family’s universe regardless of social stature. Heating, cooking, washing – both body and clothing – smoking, curing all took place on the kitchen hearth. Building a heat-sustaining fire meant the difference between death and survival.
Regrettably, the art of building a warming, long lasting fire has disappeared. When the weather dips into the single digits, it is time to build a fire for warmth not atmosphere. Throw out the grate, push the andirons to the side and build a perfect fire.
The single most important thing to remember when building a proper fire is not to allow any air to get underneath the logs. Air creates a roaring fire, which will send most of the heat up the chimney. Attractive and exciting, a blazing fire wastes wood and needs constant tending. Only the embers in the fire throw out heat into the room. When air gets under the fire, wood burns quickly, brightly and on all sides. By preventing a draft of air from passing through the fire only the top surface and face of the wood will burn, creating a bed of glowing, hot embers which radiates a huge amount of heat into the room not up the chimney. Therefore, and this will probably drive some neat nicks crazy, it is necessary to maintain a bed of ashes on the hearth of the fireplace during the fire burning season.
As for those grates, touted as essential for a wood-burning fireplace, they were actually designed for burning coal, which needs air underneath to burn. Since few people burn coal any longer, my advice is to sell them for scrap. Andirons were never designed to function as grates but rather to prevent round logs from tumbling out of the fireplace. Our andirons are handsome so I leave them in the fireplace, pushed to the sides since most firewood is split and doesn’t roll very well. If using andirons, make sure to maintain the ash bed about an inch or two over the andiron’s legs to keep air from getting under the burning log and to prevent the iron legs from being destroyed by the intense heat of the embers.
Once you have your ash bed, building a proper, long lasting fire is quite simple. Begin by placing a large log to the very rear of the fireplace. This log, appropriately called the backlog, should measure eight to ten inches in diameter. (The traditional Yule log was an especially large backlog, meant to burn throughout the Holidays.) Since it rests against the rear wall of the fireplace and burns only in the front, the back log protects the fireplace wall from being burned out. A perfect backlog will burn for many hours before having to be replaced. In our house we call backlogs ‘all day suckers.’
Next, place a smaller log toward the front just behind the andirons or placed where the andiron would traditionally be. This fore log, should measure four to six inches in diameter and should be pressed into the ash bed to prevent air from escaping underneath. Crumple some newspaper and place it in the trough created between the two logs. Then pile kindling on top of the paper. Depending on the quantity and the quality of my kindling I often cheat by using chunks of those Duraflame logs. One Duraflame log will help light twenty to thirty fires. Use a sharp knife to cut off two-ounce chunks. These are easily and safely lighten with a match. Place a few lighted chunks on the newspaper then top with the kindling then some smaller logs. This usually will get any fire going. When it comes to kindling get creative. Everything from shards from the bottom of the wood pile, twigs from my lawn, wine corks, spent candle nubs, broken up wooden crates, to waxed cardboard boxes which are used to ship wet vegetables will work. (Restaurants and grocers are happy to get rid of them.)
Don’t skimp with the wood when starting the fire. Skimp later once your perfect fire gets going and all you need to do is to maintain the heat that produced by the accumulation of the red-hot embers on the ash bed. (A rip roaring initial fire will produce a sufficient amount of embers to really start heating up most rooms.) At this early stage there will be some spectacular flames shooting up as though a house were burning down. These high flames may look great but they actually throw out very little heat. Once the ember bed is established the flames will calm down, rising no more than a few inches above the logs.
To maintain a proper fire, feed it from both the front and the back. The largest log, always placed against the back wall, will burn the longest. When it is burned down in size, pull it toward the front and replace it with another large log. The rest of the time your feed replacement logs from the front. As the ember mass begins to burn down simply push the fore log back over the embers and replace it with another log or two depending on how far the fire has burned down. A good pair of sturdy fireplace tongs is indispensable for this work.
One way to judge the quality of your fire is to remember that, if the flames are too high, air is probably getting underneath the logs. To correct this simply give them a jab with your poker knocking them downwards towards the ash bed which by this time should be covered with burning embers. Always remember to keep the backlog higher than the other logs because it is the burning embers on the front surface of the backlog that throws the heat out into the room.
By building the fire in this manner, you will be sending the heat into the room not up the chimney.
If your fire is still going when you go to bed and you wish to have a fire in the morning, you can dampen the fire by covering the embers with ashes gathered from the sides of the fire. In the morning, scrape the ashes back to the side and place new wood on the preserved embers. This really works. I’ve done it a hundred times.
And finally, some safety tips:
Safety Rule Number One: Never leave a fire unattended without placing a screen in front of it.
Open fireplaces that burn wood are inherently dangerous. This is because it is hard to judge how different logs will burn. Every once in a while you will hear a crack or a pop accompanied by a chunk of ember flying out beyond the safety of the stone hearth. While these little embers are usually harmless and can be easily brushed back on to the hearth they are capable of starting a smoldering fire if they land on some flammable material and are not immediately attended to.
Keep your chimney clean. Chimney fires, while rather infrequent, can be frightening and even result in burning down your home. Schedule an annual fireplace inspection with a chimney sweep. They’re usually quite reasonable and can advise you on how often you need a cleaning based on how frequently you build fires.
Use the proper wood in your fireplace. Well-seasoned hard wood such as oak, maple, walnut, birch and fruitwoods such as apple and cherry throw out the most heat. Ask your fire wood guy. They are usually very knowledgeable. Don’t burn evergreens even if they are available and free for the taking. Pine creates little heat and throws off creosote when burned, the number one cause of chimney fires.
The joy of building a proper fire can be immense. You may even find yourself mesmerized by its warm glow instead of the television or computer screen.
A Kitchen Fireplace?
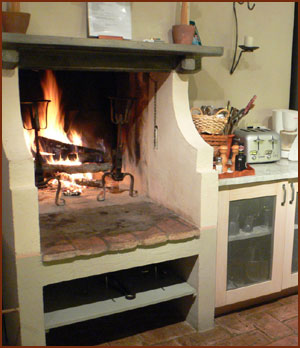 Back when people cooked mostly in the fireplace, the fireplace was the kitchen. Nowadays, fireplaces are put in kitchens for various reasons many of which are not appropriate or practical. Understanding some basic principals of fireplace cooking will help one to make better choices. Building a conventional fireplace in your kitchen (even if you could spare the space) will do little more than provide a few evenings of cozy ambiance and limited ability to do real fire based cooking on a regular basis. If this is your choice, try to build a raised firebox and oversized hearth for more convenient operation. Otherwise, the design at the picture on the right is the best solution I have found for incorporating cooking with live coals in a modern kitchen. Note the large ratio of "hearth" area to fire box or wood burning area. This picture is from Tuscany and unfortunately, I don't sell these or even have a source for this appliance. Show this picture to your local mason and ask if he can build one for you.
Fire Wood
Wood Quality:
High quality, well seasoned firewood greatly influences fireplace efficiency and enjoyment. Well seasoned firewood starts easier, burns cleaner, and generates more heat. Green, wet wood can cause problems with smoke, odor, creosote build-up and flu fires.
Choosing Firewood:
Freshly cut wood can contain up to 45% water. Well-seasoned wood ranges from 20-25% moisture content. Well-seasoned wood is easier to start, produces more heat, and burns cleaner. The important thing to remember is that the water must be gone before the wood will burn. In general, it takes about six months for wood to dry if stored uncovered, outside. Three to four months may be sufficient if under roof, cut in short lengths, and split for more air exposure.
NOTE: Wood exposed to constant rain or snow absorbs large amounts of moisture, and may rot. Store wood off the ground, protected from excess moisture, such as under a roof or in a loose-sided shed which allows for air circulation. But be aware: firewood attracts termites. Limit the amount stored next to the house or garage to just a one-week supply.
How can you tell if wood is seasoned?
Well-seasoned firewood generally has darkened ends with visible cracks or splits. It is relatively light weight, and makes a sharp, distinctive "clink" when two pieces strike each other. Green wood feels heavier, the ends look brighter and fresher, and they make more of a dull "thud" when bumped together. But, these visual signs can be tricky to detect. To be sure, buy your wood in the spring and store it until the following fall and winter.
Test: If you're not sure if your wood is dry enough, lay one piece in the fireplace and try to light it with a piece of paper. If it doesn't ignite, it's too wet. If it does light, but sizzles and requires constant stoking, it is still too wet. A good dry piece of wood will fire easily and burn nicely without much attention in a normal draft.
What type of wood is best?
Pound for pound, all wood has about the same BTU, but hardwoods weigh more, and therefore have higher heat potentials. Hardwoods also burn slower, which means less trips to the wood pile! Hardwoods include oak, hickory, ash and cherry. Some softer woods, such as elm or maple, are also suitable for burning, but you should expect to pay considerably less for them.
Additional information on firewood:
http://muextension.missouri.edu/explorepdf/agguides/forestry/G05450.pdf